Exploring Twine
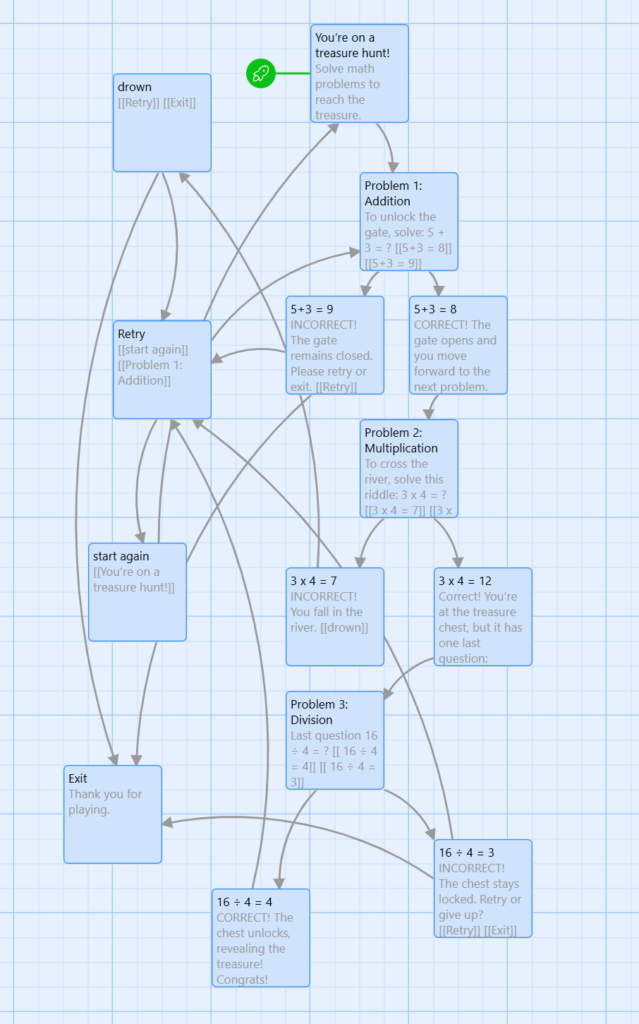
A link to my Twine Branched Story: https://rena711.github.io/Twine-treasure-hunt/
I decided to create a math treasure hunt in Twine. I found it to be a fun way to combine storytelling with interactive learning. The project involved building a narrative where learners solve math problems at each checkpoint to unlock new paths and ultimately reach the treasure. This approach offers learners the opportunity to practice math skills in a low-pressure environment.
My video teaching the 6 Basic Crochet Stitches
I’ve been learning how to crochet, so I thought this would be a fun way to see how much I remembered and create an opportunity for others to learn too.
Crochet Tutorial: Six Basic Crochet Stitches Script
Hi everyone,
Today I’ll be teaching the six basic crochet stitches. These stitches can be used for just about any beginner project. So let’s get started!
1. Slip Stitch
The first stitch I’ll be teaching is called the slip stitch. This is how you would usually begin a crochet project:
- Start by making a loop.
- Bring the yarn through the loop and insert your crochet hook into it.
- Pull on both ends of the yarn to tighten it.
2. Chain Stitch
Next is the basic chain stitch. Here’s how it’s done:
- Yarn over once.
- Pull the bottom yarn over the top one.
- Repeat: yarn over once and pull the bottom one over.
- Keep repeating: yarn over once and pull the bottom one over.
And that is the chain stitch!
3. Single Crochet
The next stitch is called the single crochet. Here’s how to do it:
- Start with the chain stitch from earlier.
- Insert the crochet hook into the second chain stitch.
- Yarn over and pull through the first loop.
- Yarn over again and pull through the bottom two loops.
By the end, there should be one loop left on the crochet hook.
Let me show you again:
- Insert the crochet hook into the next chain stitch.
- Yarn over, pull through the first loop.
- Yarn over again and pull through the next two loops.
And that is a single crochet!
4. Half Double Crochet
Next, we have the half double crochet. This stitch is a bit different and creates a slightly taller stitch:
- Yarn over and insert the hook into the second chain stitch.
- Yarn over again and pull through the stitch. You should now have three loops on your hook.
- Yarn over once more and pull through all three loops on the hook.
Let’s do that again:
- Yarn over, insert the hook into the next chain stitch, and yarn over again.
- Pull through the stitch so that there are three loops on your hook.
- Yarn over again and pull through all three loops on the hook.
And that is the half double crochet!
5. Double Crochet
The next stitch I’ll demonstrate is called the double stitch. Here’s how it’s done:
- Yarn over and insert the crochet hook into the second chain stitch.
- Yarn over again and bring the crochet hook through the next stitch.
- Yarn over and pull through the first two loops on the crochet hook.
- Yarn over again and pull through the remaining two loops.
And that is a double stitch!
Let me repeat:
- Yarn over, insert the hook into the next chain stitch, and yarn over again.
- Pull through the first two loops.
- Yarn over, pull through the next two loops.
And that’s the double stitch!
6. Treble Crochet
Now, let’s move on to the treble crochet. Here’s how you do it:
- Yarn over twice.
- Insert the hook into the next chain stitch.
- Yarn over and pull through the first loop.
- Yarn over again and pull through the next two loops.
- Yarn over once more and pull through the next two loops.
- Finally, yarn over again and pull through the last two loops.
And that’s a treble crochet! Let me show you again:
- Yarn over twice, insert the hook into the next chain stitch, and yarn over.
- Pull through the first loop.
- Yarn over, pull through the next two loops.
- Yarn over again, pull through the next two loops.
- Yarn over once more, pull through the final two loops.
And that’s it for the treble crochet!
Reflection on Readings
In this week’s readings, I found Richard Turere’s TED Talk about his invention to protect livestock from lions really interesting. His use of a personal story (Technique 2) was inspiring. By sharing his challenges and how he overcame them, he made the story relatable. Also, his use of simple visuals to support his narrative (Technique 1) made his talk more engaging. His talk helped demonstrate how storytelling can make even complex topics accessible and meaningful.
Capturing Video Beyond the Screencast
Capturing video away from the screencast was both challenging and rewarding. On one note, it allowed me to incorporate physical demonstrations and real-world visuals, making the content more engaging. Setting up proper lighting and framing shots added a professional touch that made the final product more interesting.
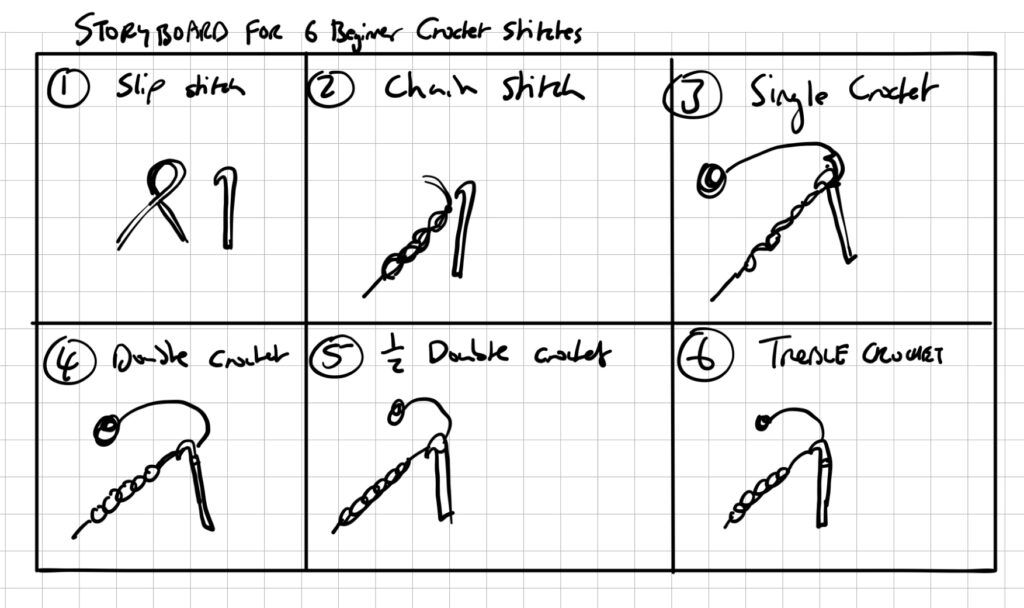
However, I encountered challenges with sound quality and finding the right angles to clearly show my hands for the stitches. Editing the footage to align with my script was also time-consuming. If I were to do this again, I would invest more time in pre-planning and include a detailed storyboard.
Reflection on the Wave Report
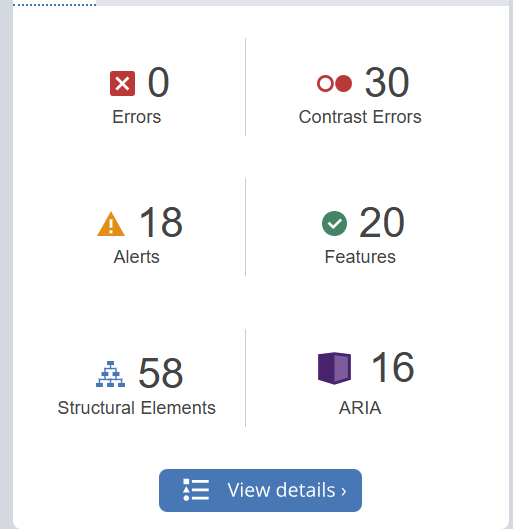
In my WAVE report, I found that while there were no major errors except contrast errors. The contrast errors were unexpected, and emphasize the need to choose high-contrast colors for my text and background. These findings highlight areas where I can improve accessibility in future designs, especially the importance of color contrast and being mindful of structural elements.
Exploring Text-to-Speech Tools
I have used Text-to-Speech tools before, but I experimented with different voices in this module. I found that certain voices, especially those with a steady pace and clear tone, made information easier to absorb.
The tool seems extremely useful for making content accessible and allowing users to multitask. This experience reinforced the importance of providing audio options.
Creating an Infographic on Air Pollution
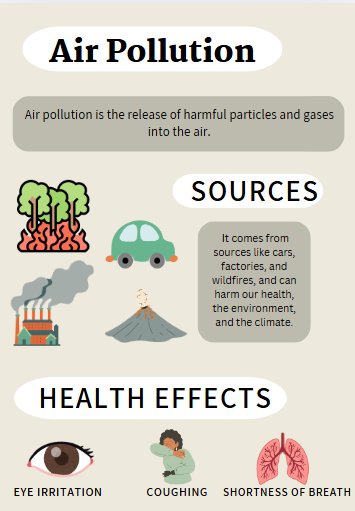
For this module, I used Canva to create infographic on Air Pollution.
Design principles I used:
- Contrast: contrast between text and background colors to enhance readability.
- Hierarchy: Using bold headings like “Sources” and “Health Effects” helped guide viewers through each section logically.
- Icons and Visuals: I used icons to represent different sources of pollution and health effects, making the content more visually engaging and easier to understand.
What Inclusive Design Means to Me
Inclusive design means creating content that considers all users, particularly those with more challenges. It’s about ensuring that everyone has an equal opportunity to access and engage with the material. To me, inclusive design is an approach that values each learner’s experience and abilities.
Ensuring Accessibility for Learners with Visual Impairments
To make infographics accessible for those with visual impairments, I would add the following:
- Detailed Alt Text: Include descriptive alt text for all icons and visuals, explaining the content and context of the infographic.
- Transcript Option: Provide a written transcript or text description of the infographic, outlining each section’s content so that screen readers can convey the information.
- High-Contrast Colors: Adjust colors to high contrast, making text legible for users with low vision or color blindness.
Reflection
For this week, I explored creating an H5P activity using dialog cards to reinforce vocabulary in Chinese, specifically country names. I am learning Chinese now so this seemed like a good way to reinforce what I have learnt so far.
Using dialog cards was inspired by Merrill’s principles, especially the emphasis on application and integration of new knowledge. Presenting vocabulary as a quick recall activity encourage learners to apply what they know and the format helps build confidence and fluency.
Active Learning vs. Passive Learning
The balance between passive and active learning has been evident throughout this course. I find that when I engage in hands-on activities, like creating H5P content, I retain more than when I only read or listen to new information. This aligns with the Harvard study on active learning, which highlights that, while students may feel that traditional methods are easier, they actually gain a deeper understanding from active learning tasks. This experience has shown me the power of interactive tools to convert concepts from passive to active learning, helping to solidify new knowledge.
Future Use of H5P in Teaching
Dialog cards in H5P have been easy to use and effective for vocabulary practice, making them a good fit for self-paced student learning. I also want to try other H5P formats, like interactive videos or quizzes, to provide instant feedback.
An Example of Scaffolding From Learning Experience
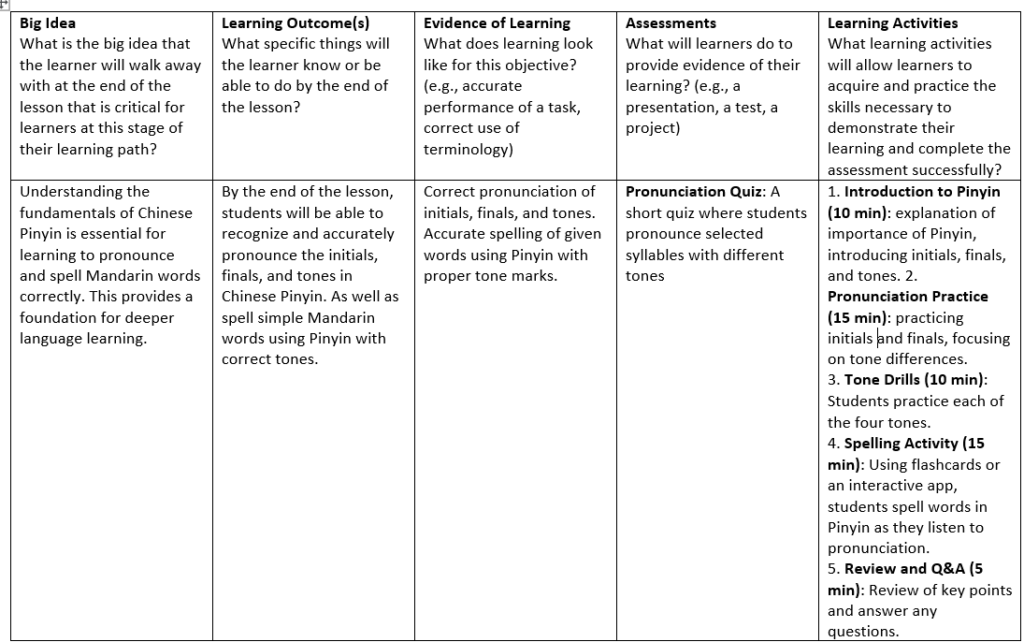
This is the approach I experience in my Chinese class while learning Chinese pinyin.
- Modeling (I Do): Our teacher introduced Pinyin sounds and tones, demonstrating each one while we listened.
- Guided Practice (We Do): We repeated each sound with the teacher, practicing pronunciation and receiving feedback.
- Group Practice: In small groups, we practiced assigned Pinyin syllables together, helping each other with tones.
- Independent Practice (You Do): We then practiced reading and recording our pronunciation individually.
- Assessment and Reflection: Finally, we took a short pronunciation assessment and reflected on where we could improve.

AI generated image with the prompt “a cat sitting by the window watching the aurora with a city backdrop”.
Exploring Craiyon
This week, I explored Craiyon, a Generative AI tool for image creation. Using Craiyon, I noticed that the tool effectively generates visually engaging images from text prompts with many different variations of images to choose from. The outputs would sometimes be abstract or the quality of the image were not that great. However, It was a fun experience seeing how it can so easily generate an image from a prompt.
A SAMR analysis on Craiyon done by ChatGPT
An analysis done for chatGPT with the prompt “give me a SAMR analysis on the generative AI tool Craiyon” :
Here’s a concise SAMR analysis of Craiyon, the Generative AI tool:
SAMR Analysis of Craiyon
- Substitution:
- Description: Craiyon replaces traditional methods of image creation (e.g., drawing, painting, or using graphic design software) with a text-based input system. Users can generate images based solely on textual prompts.
- Example: Instead of creating a hand-drawn illustration, a student types a description and receives an AI-generated image in seconds.
- Augmentation:
- Description: Craiyon enhances the image creation process by allowing users to quickly generate unique visuals that can support and illustrate concepts in various subjects. It can provide inspiration and diverse perspectives that a single artist might not capture.
- Example: A teacher can input prompts related to historical events to generate relevant images, which can help students visualize and discuss the context more effectively.
- Modification:
- Description: Craiyon facilitates significant redesign of tasks by enabling collaborative projects. Students can work together to create a series of images that represent a narrative or complex idea, allowing for more interactive and engaging learning experiences.
- Example: A group project where students use Craiyon to generate different scenes from a story they are studying, which they then present as a visual summary.
- Redefinition:
- Description: Craiyon enables new learning tasks that were not possible before. Students can create visual content that reflects multiple viewpoints on a topic, encouraging deeper analysis and discussion.
- Example: An assignment where students generate images depicting various cultural interpretations of a theme, followed by a class discussion on the differences and similarities portrayed.
Conclusion
The SAMR model illustrates how Craiyon can transform learning experiences, from basic image substitution to redefining how students engage with and interpret visual information. By leveraging its capabilities, educators can foster creativity, collaboration, and critical thinking in their classrooms.
Reflection on Generative AI
I found Craiyon to be helpful for quickly visualizing concepts based on my prompts. The analysis above indicates that Craiyon can effectively enhance creative tasks through Substitution and Augmentation, while also transforming them via Modification and Redefinition. However, I’m not sure about the originality of the generated content (potential biases in its training data). As for ChatGPT, it seems like valuable resource for deepening my understanding of complex topics.
For effectively integrating generative AI into educational settings, establishing guidelines and promoting ethical use and accessibility would be important. So this would be things like developing comprehensive training programs for educators and students. These tools can create a more inclusive learning environment by helping those with diverse learning styles. It could, however, exclude those that do not have access to technology.
Moving forward, I plan to use generative AI tools primarily for brainstorming and visualizing concepts, and avoid relying on them for critical decision-making or complex analyses. As for the next 2-3 years, I anticipate that generative AI tools will become even more advanced, with improved accuracy and more user-friendly interfaces.
MLA CITATION:
Craiyon: Craiyon. “Craiyon: A Free AI Model for Generating Images from Text.” Craiyon, 2024, www.craiyon.com. Accessed 12 Oct. 2024.
ChatGPT: OpenAI. “ChatGPT: Optimizing Language Models for Dialogue.” OpenAI, 2023, www.openai.com/chatgpt. Accessed 12 Oct. 2024.
Adobe Illustrator: The Basics
I’ve been using Adobe Illustrator since the beginning of the year and found it fun and rewarding. I wanted to share my enthusiasm and help others discover its potential for creativity and design.
I created a screencast on that covers the basics of using the tools. It’s designed to help beginners get comfortable with the interface and start creating their own designs, whether for personal projects or professional work.
Using Mayer’s Cognitive Theory
While recording the screencast, I kept modality in mind. Rather than overloading the screen with text, I opted for narration (voice principle) to explain concepts while demonstrating the actions on the screen. This is also supported by Dual Coding Theory, which suggests that learners process audio and visual information in separate channels. By narrating while showing how to use a tool, I hoped to activate both channels and create a richer learning experience.
I also made use of pretraining (through PowerPoint slides) to introduce key concepts before diving into the application. In the screencast, I explained terms like “path” and “anchor point” early on, ensuring that learners had a solid understanding of the basics.
Cognitive Load Theory
One of the main principles I used was Cognitive Load Theory. Since Illustrator has so many features, I focused on reducing extraneous cognitive load by focusing on a select few. Rather than covering too many tools at once, I broke the content into smaller, manageable sections. This allowed learners to focus on one concept at a time and to retain the material effectively.
Segmenting Principle
I used the segmenting principle when teaching the Pen tool, I started with the basics—creating straight lines—before moving on to curves and complex shapes. This helped manage intrinsic cognitive load, making the tutorial easier to follow by gradually increasing the complexity.
What Surprised Me
One aspect that surprised me from the module was how research shows that adding your own image to the screen during a presentation doesn’t actually enhance learning and may even distract from the content (the image principle). I’ll keep this in mind when deciding whether to include my image in future screencasts and focus more on the quality of my narration and demonstrations instead.
Final Thoughts
Reflecting on this module, I’ve gained a better understanding of how people learn. The CTML principles have refined my approach to designing screencasts, helping me create more effective multimedia experiences. Moving forward, I will focus on reducing extraneous load, balancing dual coding with redundancy, and personalizing content to keep learners engaged.
Introduction
Learning Pod Self Reflection
What is your preferred mode of remote communication?
Message/discord
What are your communication strengths?
I am a good listener
What are your communication weaknesses? Where would you like to grow?
I sometimes forget to reply to messages, so I would like to work on that.
Do you consider yourself an introvert or extrovert?
introvert
What time zone are you in?
PDT
What time of day do you prefer doing academic work?
Afternoon/evening
When you are upset do you tend to share this with others or keep it to yourself?
I tend to keep it to myself. It’s something I’m working on.
What do you like about group work?
We can support one another, and it helps relieve the pressure. Also, a good way to hear other’s opinions and form new ideas.
What don’t you like about group work?
Sometimes the workload can feel unequal between teammates.
What else would you like your team to know?
Nothing really, let’s do well this semester!! 🙂
Recent Comments