Category: Uncategorised
Exploring Twine
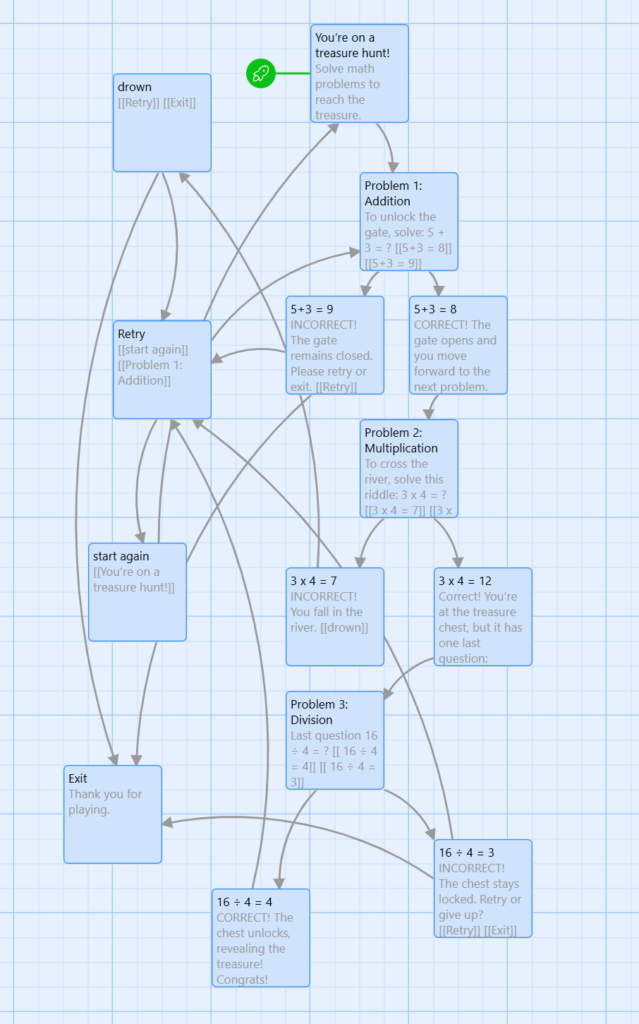
A link to my Twine Branched Story: https://rena711.github.io/Twine-treasure-hunt/
I decided to create a math treasure hunt in Twine. I found it to be a fun way to combine storytelling with interactive learning. The project involved building a narrative where learners solve math problems at each checkpoint to unlock new paths and ultimately reach the treasure. This approach offers learners the opportunity to practice math skills in a low-pressure environment.
My video teaching the 6 Basic Crochet Stitches
I’ve been learning how to crochet, so I thought this would be a fun way to see how much I remembered and create an opportunity for others to learn too.
Crochet Tutorial: Six Basic Crochet Stitches Script
Hi everyone,
Today I’ll be teaching the six basic crochet stitches. These stitches can be used for just about any beginner project. So let’s get started!
1. Slip Stitch
The first stitch I’ll be teaching is called the slip stitch. This is how you would usually begin a crochet project:
- Start by making a loop.
- Bring the yarn through the loop and insert your crochet hook into it.
- Pull on both ends of the yarn to tighten it.
2. Chain Stitch
Next is the basic chain stitch. Here’s how it’s done:
- Yarn over once.
- Pull the bottom yarn over the top one.
- Repeat: yarn over once and pull the bottom one over.
- Keep repeating: yarn over once and pull the bottom one over.
And that is the chain stitch!
3. Single Crochet
The next stitch is called the single crochet. Here’s how to do it:
- Start with the chain stitch from earlier.
- Insert the crochet hook into the second chain stitch.
- Yarn over and pull through the first loop.
- Yarn over again and pull through the bottom two loops.
By the end, there should be one loop left on the crochet hook.
Let me show you again:
- Insert the crochet hook into the next chain stitch.
- Yarn over, pull through the first loop.
- Yarn over again and pull through the next two loops.
And that is a single crochet!
4. Half Double Crochet
Next, we have the half double crochet. This stitch is a bit different and creates a slightly taller stitch:
- Yarn over and insert the hook into the second chain stitch.
- Yarn over again and pull through the stitch. You should now have three loops on your hook.
- Yarn over once more and pull through all three loops on the hook.
Let’s do that again:
- Yarn over, insert the hook into the next chain stitch, and yarn over again.
- Pull through the stitch so that there are three loops on your hook.
- Yarn over again and pull through all three loops on the hook.
And that is the half double crochet!
5. Double Crochet
The next stitch I’ll demonstrate is called the double stitch. Here’s how it’s done:
- Yarn over and insert the crochet hook into the second chain stitch.
- Yarn over again and bring the crochet hook through the next stitch.
- Yarn over and pull through the first two loops on the crochet hook.
- Yarn over again and pull through the remaining two loops.
And that is a double stitch!
Let me repeat:
- Yarn over, insert the hook into the next chain stitch, and yarn over again.
- Pull through the first two loops.
- Yarn over, pull through the next two loops.
And that’s the double stitch!
6. Treble Crochet
Now, let’s move on to the treble crochet. Here’s how you do it:
- Yarn over twice.
- Insert the hook into the next chain stitch.
- Yarn over and pull through the first loop.
- Yarn over again and pull through the next two loops.
- Yarn over once more and pull through the next two loops.
- Finally, yarn over again and pull through the last two loops.
And that’s a treble crochet! Let me show you again:
- Yarn over twice, insert the hook into the next chain stitch, and yarn over.
- Pull through the first loop.
- Yarn over, pull through the next two loops.
- Yarn over again, pull through the next two loops.
- Yarn over once more, pull through the final two loops.
And that’s it for the treble crochet!
Reflection on Readings
In this week’s readings, I found Richard Turere’s TED Talk about his invention to protect livestock from lions really interesting. His use of a personal story (Technique 2) was inspiring. By sharing his challenges and how he overcame them, he made the story relatable. Also, his use of simple visuals to support his narrative (Technique 1) made his talk more engaging. His talk helped demonstrate how storytelling can make even complex topics accessible and meaningful.
Capturing Video Beyond the Screencast
Capturing video away from the screencast was both challenging and rewarding. On one note, it allowed me to incorporate physical demonstrations and real-world visuals, making the content more engaging. Setting up proper lighting and framing shots added a professional touch that made the final product more interesting.
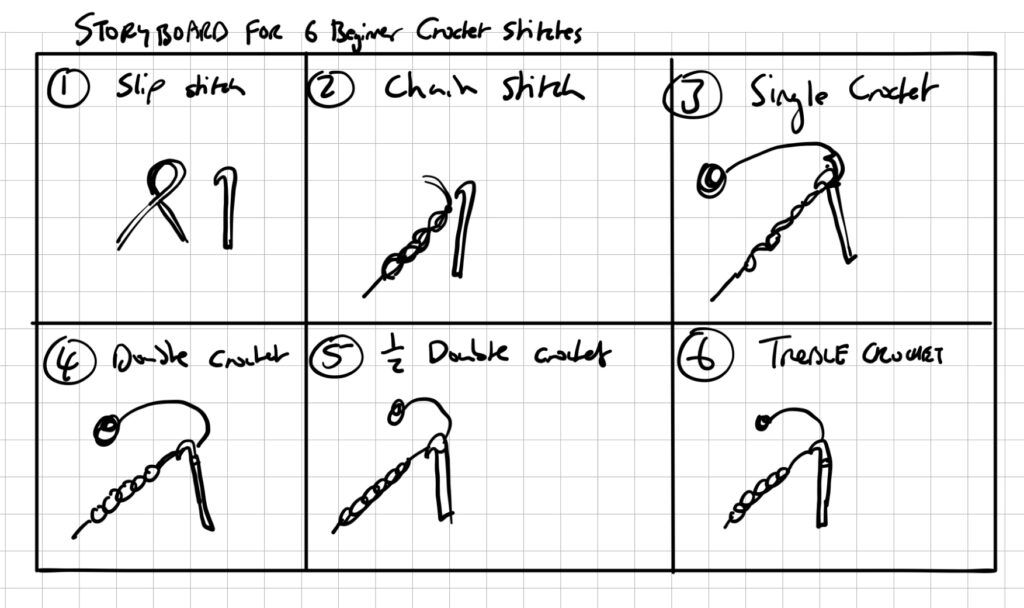
However, I encountered challenges with sound quality and finding the right angles to clearly show my hands for the stitches. Editing the footage to align with my script was also time-consuming. If I were to do this again, I would invest more time in pre-planning and include a detailed storyboard.
Reflection on the Wave Report
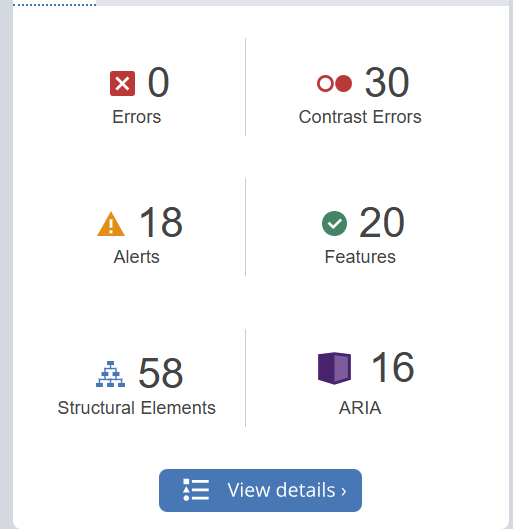
In my WAVE report, I found that while there were no major errors except contrast errors. The contrast errors were unexpected, and emphasize the need to choose high-contrast colors for my text and background. These findings highlight areas where I can improve accessibility in future designs, especially the importance of color contrast and being mindful of structural elements.
Exploring Text-to-Speech Tools
I have used Text-to-Speech tools before, but I experimented with different voices in this module. I found that certain voices, especially those with a steady pace and clear tone, made information easier to absorb.
The tool seems extremely useful for making content accessible and allowing users to multitask. This experience reinforced the importance of providing audio options.
Creating an Infographic on Air Pollution
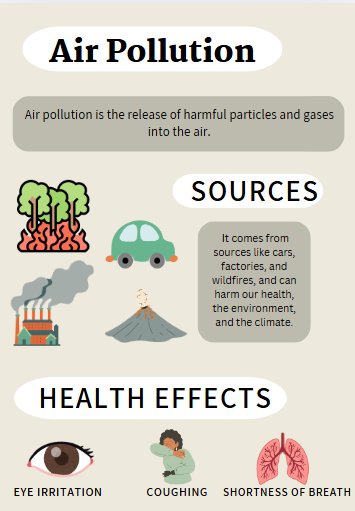
For this module, I used Canva to create infographic on Air Pollution.
Design principles I used:
- Contrast: contrast between text and background colors to enhance readability.
- Hierarchy: Using bold headings like “Sources” and “Health Effects” helped guide viewers through each section logically.
- Icons and Visuals: I used icons to represent different sources of pollution and health effects, making the content more visually engaging and easier to understand.
What Inclusive Design Means to Me
Inclusive design means creating content that considers all users, particularly those with more challenges. It’s about ensuring that everyone has an equal opportunity to access and engage with the material. To me, inclusive design is an approach that values each learner’s experience and abilities.
Ensuring Accessibility for Learners with Visual Impairments
To make infographics accessible for those with visual impairments, I would add the following:
- Detailed Alt Text: Include descriptive alt text for all icons and visuals, explaining the content and context of the infographic.
- Transcript Option: Provide a written transcript or text description of the infographic, outlining each section’s content so that screen readers can convey the information.
- High-Contrast Colors: Adjust colors to high contrast, making text legible for users with low vision or color blindness.
Reflection
For this week, I explored creating an H5P activity using dialog cards to reinforce vocabulary in Chinese, specifically country names. I am learning Chinese now so this seemed like a good way to reinforce what I have learnt so far.
Using dialog cards was inspired by Merrill’s principles, especially the emphasis on application and integration of new knowledge. Presenting vocabulary as a quick recall activity encourage learners to apply what they know and the format helps build confidence and fluency.
Active Learning vs. Passive Learning
The balance between passive and active learning has been evident throughout this course. I find that when I engage in hands-on activities, like creating H5P content, I retain more than when I only read or listen to new information. This aligns with the Harvard study on active learning, which highlights that, while students may feel that traditional methods are easier, they actually gain a deeper understanding from active learning tasks. This experience has shown me the power of interactive tools to convert concepts from passive to active learning, helping to solidify new knowledge.
Future Use of H5P in Teaching
Dialog cards in H5P have been easy to use and effective for vocabulary practice, making them a good fit for self-paced student learning. I also want to try other H5P formats, like interactive videos or quizzes, to provide instant feedback.
An Example of Scaffolding From Learning Experience
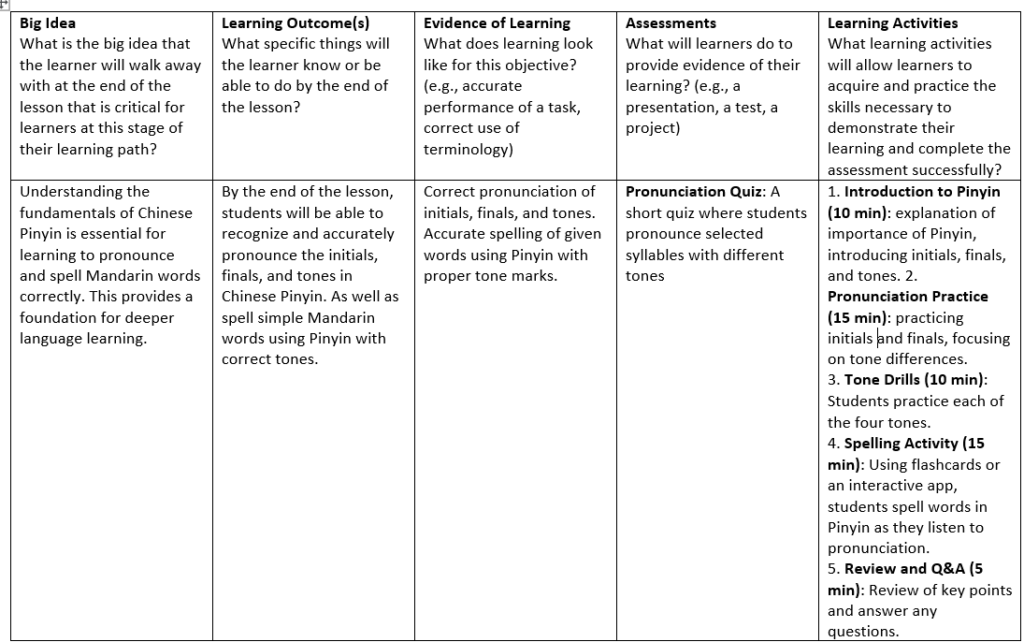
This is the approach I experience in my Chinese class while learning Chinese pinyin.
- Modeling (I Do): Our teacher introduced Pinyin sounds and tones, demonstrating each one while we listened.
- Guided Practice (We Do): We repeated each sound with the teacher, practicing pronunciation and receiving feedback.
- Group Practice: In small groups, we practiced assigned Pinyin syllables together, helping each other with tones.
- Independent Practice (You Do): We then practiced reading and recording our pronunciation individually.
- Assessment and Reflection: Finally, we took a short pronunciation assessment and reflected on where we could improve.
Recent Comments